
Welcome to the wonderful world of effortless dessert making. If you are a busy home cook, you know that finding time to bake can be a challenge. Our 5-ingredient no-bake lemon cheesecake bars offer the perfect solution for your sweet cravings.

These delicious cheesecake bars require zero oven time, making them an ideal treat for hot summer days or quick weeknight snacks. You will love how the zesty, refreshing flavor profile brightens up any gathering without the stress of traditional baking methods.
By choosing these no-bake cheesecake bars, you save precious time while still serving a crowd-pleasing dessert. Get ready to dive into the simple steps required to master this zesty delight in your own kitchen today.
The Appeal of Simple No-Bake Desserts
The rise of no-bake treats has transformed how we approach dessert preparation in busy American households. Many home cooks now prioritize efficiency without sacrificing the rich, indulgent flavors that guests love. By choosing an easy cheesecake bars recipe, you can enjoy a professional-quality dessert while keeping your kitchen environment calm and clutter-free.
Why Choose No-Bake Recipes
No-bake recipes offer unparalleled convenience for those who balance work, family, and social commitments. These desserts eliminate the need for preheating ovens or monitoring baking times, which significantly reduces the risk of kitchen mishaps. Stress-free entertaining becomes a reality when your dessert is already chilling in the refrigerator.
Beyond the time savings, these recipes maintain a high standard of quality. You get the same creamy, decadent texture found in traditional baked goods, but with much less effort. This approach allows you to focus on presentation and hosting rather than being tied to the stove.
The Magic of Five Ingredients
The true beauty of the best cheesecake bars lies in their minimalist ingredient list. Using only five components simplifies your grocery shopping and keeps your pantry organized. This streamlined process ensures that even novice bakers can achieve consistent, delicious results every single time.
When you focus on simple cheesecake bars, you remove the intimidation factor often associated with complex baking. This method highlights the quality of each individual component, allowing the natural flavors to shine through. The following table illustrates why this method is a favorite for modern hosts.
| Feature | Traditional Baking | No-Bake Method |
|---|---|---|
| Preparation Time | High (60+ mins) | Low (15 mins) |
| Equipment Needed | Oven, Mixers, Pans | Bowl, Spatula, Pan |
| Skill Level | Advanced | Beginner-Friendly |
| Kitchen Heat | High | None |
Essential Ingredients for Your Cheesecake Bars
Achieving professional results at home requires a focus on the quality of your pantry staples. When you prepare homemade cheesecake bars, the specific items you choose dictate the final texture and brightness of the dessert. By selecting the right components now, you ensure a smooth assembly process later.
Selecting the Right Cream Cheese
The foundation of any great cheesecake is the cream cheese itself. You should always opt for full-fat cream cheese in block form rather than the spreadable tubs. The higher fat content provides the necessary structure to keep your cheesecake bars firm and velvety once chilled.
Avoid using low-fat or whipped varieties, as they contain too much air and moisture. These alternatives often lead to a runny consistency that fails to set properly. Using high-quality, full-fat blocks ensures a rich, decadent mouthfeel in every bite.
Choosing Quality Lemon Components
To achieve that signature zing, you must prioritize fresh ingredients over bottled alternatives. Freshly squeezed lemon juice provides a clean, vibrant acidity that artificial flavors simply cannot replicate. Furthermore, the fresh lemon zest contains essential oils that add a deep, aromatic complexity to your homemade cheesecake bars.
When zesting, be careful to remove only the bright yellow outer layer of the peel. The white pith underneath can introduce an unwanted bitter taste to your dessert. Incorporating these fresh elements is the secret to defining the bright, authentic citrus profile of your treat.
Graham Cracker Crust Basics
A sturdy base is essential for supporting the creamy filling of your cheesecake bars with graham cracker crust. You want a balance of sweetness and crunch that holds together without crumbling upon the first slice. High-quality graham crackers provide the perfect neutral canvas for the tangy lemon filling.
Ensure your crumbs are fine and uniform to create a consistent texture throughout the base. When combined with melted butter, these crumbs form a solid foundation that anchors the entire dessert. This simple yet effective crust is what makes these cheesecake bars with graham cracker crust a reliable favorite for any occasion.
Preparing Your Kitchen and Equipment
A well-organized kitchen is the secret weapon behind every successful baker. By taking a few minutes to prepare, you ensure that your easy cheesecake bars recipe comes together without any unnecessary stress or confusion.
Necessary Tools for Success
Having the right equipment makes the entire process feel like a breeze. You do not need a professional kitchen to achieve delicious results, but having these basics on hand is essential:
- A large, sturdy mixing bowl for combining your ingredients.
- A reliable hand mixer to ensure your filling is perfectly smooth.
- A square baking pan, which is the ideal size for this specific treat.
- A rubber spatula for scraping down the sides of your bowl.
Setting Up Your Workspace
Before you start mixing, clear off your counter space to create a clean, open area. This simple step allows you to move freely and keeps your focus entirely on the task at hand.
It is also helpful to measure all five ingredients before you begin. Having everything ready to go transforms the process into a simple cheesecake bars experience that is both highly organized and truly enjoyable.
Step One: Crafting the Perfect Graham Cracker Crust
Building a solid foundation is the secret to creating professional-looking no-bake cheesecake bars. A well-prepared base ensures that your dessert holds its shape when sliced, providing a satisfying crunch in every bite.

Crushing the Crackers Effectively
To achieve a uniform texture, you must crush your graham crackers into very fine crumbs. Using a food processor is the fastest method, but a sturdy plastic bag and a rolling pin work just as well for a rustic touch.
Ensure there are no large chunks remaining in your mixture. Consistency is key to preventing the crust from crumbling when you serve your cheesecake bars with graham cracker crust.
Mixing and Pressing the Base
Combine your crumbs with melted unsalted butter until the mixture resembles wet sand. This ratio is vital for structural integrity.
Use the bottom of a flat measuring cup to press the mixture firmly into your pan. Apply even pressure across the entire surface, especially into the corners, to create a dense, stable layer.
Chilling for Stability
Before adding your filling, place the prepared pan in the refrigerator for at least twenty minutes. This brief chilling period allows the butter to solidify, which locks the crumbs into a firm, cohesive base.
| Crust Component | Purpose | Key Tip |
|---|---|---|
| Graham Crumbs | Provides structure | Use fine, even grains |
| Melted Butter | Acts as a binder | Do not overheat |
| Granulated Sugar | Adds sweetness | Mix thoroughly |
Step Two: Creating the Creamy Lemon Filling
Creating the perfect lemon filling is the secret to making these the best cheesecake bars you have ever served. This layer provides that signature bright, citrusy punch that balances the richness of the cream cheese. By following a few expert techniques, you can ensure a luxurious mouthfeel that keeps everyone coming back for seconds.
Achieving the Ideal Consistency
The foundation of a great filling starts with your ingredients. You must ensure your cream cheese is at room temperature before you begin mixing. Cold cream cheese often results in stubborn lumps that are difficult to smooth out later.
When the cheese is soft, it incorporates air more easily, leading to a light and airy texture. This simple step is vital for those who want to master these simple cheesecake bars without any extra stress in the kitchen.
Incorporating Lemon Flavor Without Curdling
Adding citrus juice to dairy can sometimes cause unwanted curdling if done too quickly. To avoid this, always add your fresh lemon juice in small, steady increments while the mixer is running on low speed.
This gradual process allows the proteins in the cream cheese to emulsify with the acid properly. You will notice the mixture thickens beautifully as you incorporate the juice, creating a stable and delicious base.
Tips for a Smooth, Lump-Free Texture
If you want to guarantee a professional-grade result, use a rubber spatula to scrape down the sides of your bowl frequently. This ensures that every bit of cream cheese is fully blended into the lemon mixture.
For the ultimate simple cheesecake bars, avoid over-mixing once the ingredients are combined. A gentle touch is all you need to maintain the integrity of the filling, ensuring you achieve the best cheesecake bars with a perfectly silky finish every single time.
Step Three: Assembling the Cheesecake Bars
Transforming your prepared components into beautiful cheesecake bars requires a gentle touch. This stage is where your dessert finally takes its signature shape. By following a few simple steps, you can ensure that every layer remains distinct and visually appealing.

Layering Techniques for Professional Results
To maintain the integrity of your crust, you must pour the filling with extreme care. Start by spooning the lemon mixture into the center of the chilled base rather than dumping it all at once. This prevents the graham cracker crumbs from shifting or floating into your smooth filling.
Gently spread the mixture toward the edges of the pan using a light touch. Consistency is key when building these cheesecake bars to ensure every bite has the perfect ratio of crust to cream. Avoid pressing down too hard, as you want to keep the base firm and intact.
Smoothing the Top for a Clean Finish
Once the filling is distributed, you need to create a perfectly flat surface. An offset spatula is the best tool for this task because it allows your hand to stay above the pan while you work. Use long, sweeping motions to level the top, ensuring the mixture reaches every corner of the container.
A polished top makes your cheesecake bars look like they came straight from a professional bakery. If you notice any air bubbles, tap the pan lightly against the counter to release them before the final smoothing pass. This simple effort guarantees a clean, professional finish that is ready for your favorite garnishes.
| Tool | Primary Use | Benefit |
|---|---|---|
| Offset Spatula | Smoothing filling | Provides clean, level edges |
| Rubber Spatula | Scraping bowls | Ensures no waste of ingredients |
| Bench Scraper | Slicing bars | Creates sharp, uniform cuts |
Step Four: The Importance of Proper Chilling Time
You might be tempted to dive right in, but patience is the secret ingredient for success when making no-bake cheesecake bars. While the assembly process is quick and fun, the chilling stage is where the magic truly happens. Skipping this step often leads to a dessert that lacks the structure needed for clean, beautiful slices.
Why Patience is Key
The primary goal of refrigeration is to allow the fats within the cream cheese to solidify properly. When these fats firm up, they create a stable, velvety structure that holds everything together. Without this essential cooling period, your delicious cheesecake bars may lose their shape the moment you try to remove them from the pan.
Think of the refrigerator as a necessary tool that completes your work. Giving your dessert enough time to set ensures that every bite has that signature, smooth mouthfeel. Rushing this process is the most common mistake, so plan to let your creation rest undisturbed for several hours.
Testing for Firmness
Before you attempt to slice your dessert, you should always verify that it has set completely. Gently touch the center of the filling with your finger to check for resistance. If the surface feels firm and does not leave an indentation, your treat is ready to be served.
If the center still feels soft or wobbly, simply return the pan to the refrigerator for another hour. Patience is truly your best friend in the kitchen. Ensuring the bars are fully chilled guarantees a professional result that will impress anyone lucky enough to grab a slice.
Step Five: Slicing and Serving Your Cheesecake Bars
You can easily achieve clean, sharp edges on your homemade treats with a few simple tricks. Proper preparation ensures that your cheesecake bars look just as good as they taste. By following these professional techniques, you will impress your guests with a beautiful, bakery-style presentation.

Techniques for Clean, Sharp Edges
The secret to a perfect cut lies in the temperature of your blade. Before you begin, run a sharp knife under hot water and wipe it completely dry with a clean towel. This simple step allows the blade to glide through the chilled filling without dragging or pulling.
For the best results, wipe the knife clean and reheat it between every single slice. This prevents the creamy filling from sticking to the metal, ensuring that your cheesecake bars maintain their structural integrity. Taking your time during this process is the key to achieving those crisp, professional edges.
Temperature Considerations for Serving
These treats are designed to be enjoyed at a specific temperature to maintain their signature texture. You should always serve your cheesecake bars directly from the refrigerator. If they sit out at room temperature for too long, the filling may lose its firm, velvety structure.
Keeping them chilled until the very last moment guarantees a refreshing and stable bite. Your guests will appreciate the contrast between the crunchy crust and the cool, smooth lemon layer. Use the following guide to ensure your dessert is served at its absolute best.
| Action | Best Practice | Result |
|---|---|---|
| Knife Prep | Hot and dry | Clean, sharp edges |
| Serving Temp | Cold (from fridge) | Firm, creamy texture |
| Storage | Airtight container | Fresh cheesecake bars |
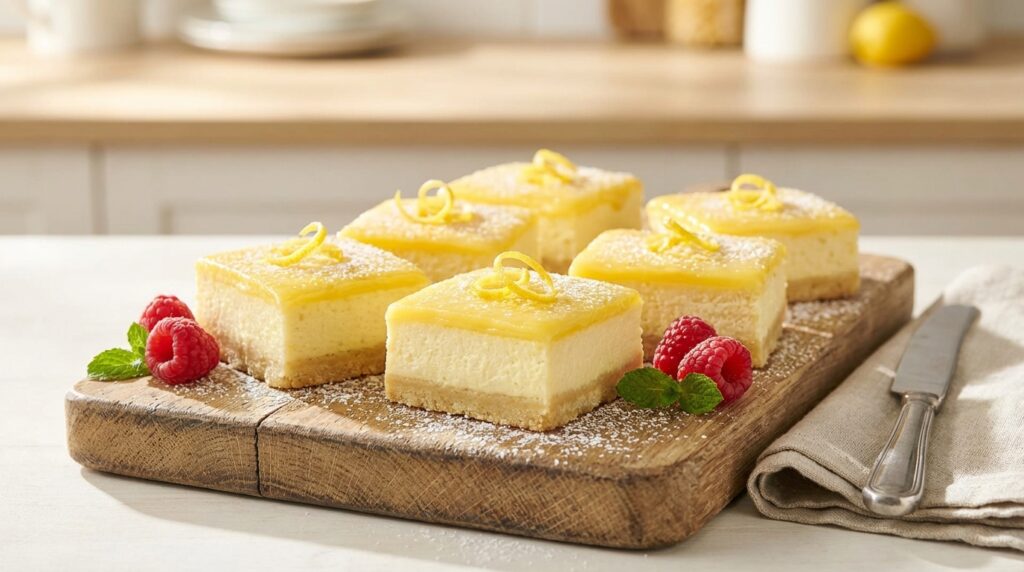
Creative Toppings to Elevate Your Dessert
You can easily transform your basic lemon bars into a gourmet treat with just a few creative additions. While the base recipe is delicious, experimenting with various cheesecake bars toppings allows you to customize the flavor profile for any event. These simple enhancements help you create the best cheesecake bars that will leave your guests asking for the recipe.
Fresh Fruit Garnishes
Adding fresh fruit is the easiest way to introduce a vibrant pop of color to your dessert. Seasonal berries like raspberries, blueberries, or sliced strawberries provide a natural sweetness that perfectly balances the tart lemon filling. You can arrange them neatly on top of each square or scatter them for a more rustic, inviting look.
Whipped Cream and Zest Additions
For a truly sophisticated, restaurant-quality presentation, consider adding a dollop of freshly whipped cream to each serving. A light dusting of fresh lemon zest over the cream adds a bright, aromatic finish that highlights the citrus notes. This combination creates a beautiful contrast in both texture and appearance, making your dessert look professionally prepared.
Drizzles and Sauces
If you want to add an extra layer of flavor, try finishing your dessert with a simple drizzle. A warm raspberry coulis or a thin ribbon of honey can elevate the taste profile significantly. These small touches ensure you serve the best cheesecake bars at any party, providing a delightful experience in every single bite.
Troubleshooting Common No-Bake Issues
Even the most seasoned home bakers occasionally run into unexpected hurdles when preparing chilled desserts. While these recipes are designed for simplicity, minor variables like temperature or ingredient quality can sometimes affect the final result. Understanding how to address these small setbacks ensures that your delicious cheesecake bars turn out perfectly every single time.

Fixing a Runny Filling
If your mixture appears too soft after the recommended time, the most common culprit is insufficient chilling. Patience is truly your best friend when working with no-bake cheesecake bars. Simply return the pan to the coldest part of your refrigerator for an additional two to four hours to allow the fats to firm up properly.
If the texture remains loose, you may have used an incorrect ratio of cream cheese to liquid ingredients. Ensure you are using full-fat block cream cheese rather than the spreadable tub variety, as the latter contains too much moisture. A quick fix involves folding in a small amount of whipped topping or extra cream cheese to stabilize the structure.
Preventing a Soggy Crust
A soggy base often results from using too much melted butter or failing to chill the crust before adding the filling. To achieve a crisp foundation, ensure your butter is thoroughly mixed with the crumbs until it resembles wet sand. Press the mixture firmly into the pan using the bottom of a measuring cup to create a dense, uniform layer.
Always prioritize a pre-chilling step for the crust before pouring your filling on top. This brief rest in the freezer helps the butter solidify, creating a moisture barrier that keeps your delicious cheesecake bars stable. Following these simple adjustments will help you master the art of no-bake cheesecake bars with confidence.
| Common Issue | Primary Cause | Recommended Solution |
|---|---|---|
| Runny Filling | Insufficient chilling time | Refrigerate for 2+ extra hours |
| Soggy Crust | Excessive butter | Add more graham cracker crumbs |
| Grainy Texture | Cold cream cheese | Ensure room temperature blending |
Storing and Preserving Your Homemade Cheesecake Bars
You have worked hard on your treats, so let’s ensure they stay perfect. Proper storage is the best way to maintain the texture and flavor of your dessert after you finish preparing it.
Refrigeration Best Practices
To keep your homemade cheesecake bars tasting fresh, you must store them in the refrigerator. Always place the bars in an airtight container to prevent them from absorbing unwanted odors from other foods in your fridge.
This simple step protects the delicate lemon flavor and keeps the crust from becoming soft. When stored correctly, your dessert will remain delicious for up to five days.
Freezing for Future Enjoyment
If you want to save your no-bake cheesecake bars for a later date, the freezer is your best friend. You can easily freeze these treats for several weeks without losing quality.
For the best results, wrap each bar individually in plastic wrap before placing them in a freezer-safe bag. When you are ready to eat, simply thaw them in the refrigerator for a few hours. This method ensures your no-bake cheesecake bars stay just as creamy as the day you made them.
Conclusion
Creating a gourmet treat at home feels rewarding when you use simple ingredients. This easy cheesecake bars recipe proves that you do not need an oven to produce a professional dessert.
You now possess the skills to balance tart citrus flavors with a buttery crust. These homemade cheesecake bars offer a refreshing finish to any meal or gathering.
Sharing these treats brings joy to your friends and family. Your kitchen is now a place where you can experiment with toppings and textures to make each batch unique.
Keep this easy cheesecake bars recipe handy for your next event. You will find that your homemade cheesecake bars become a requested favorite for every celebration.
Start your next culinary project with confidence. Enjoy the process of crafting your own delicious, no-bake masterpiece today.